Svelte Kit Basics
I will go over some Svelte Kit fundamentals. It includes examples from my project for easier understanding and
visualization.
Feel free to jump ahead to my Project Structure if you
already know how Svelte & Svelte Kit work!
For an even more indepth guide on Svelte Kit, check out the official documentation.
root
Svelte Kit projects have a pretty simple structure:
frontend            # project name
├── node_modules    # auto-generated
├── src             # main working directory
│   ├── lib
│   └── routes
├── static          # holds static files
└── ...             # config-files
node_modules are auto-generated from the built dependencies.
static holds static files for the website.
I'm not really using this directory tho. The Static File Server
serves all images & documents to the frontend.
src is the main working directory with routes and libraries.
Other than that it's mostly config files for TypeScript, Vite, Dependencies, Docker and more.
src/routes
The routes inside the src directory are key to the frontend routing:
routes
├── about_me
│   ├── bio
│   └── interests
├── contact
├── projects
│   └── [project_slug]
│       └── [...post_slug]
└── resume
    ├── download
    ├── education
    ├── languages
    ├── techstack
    │   └── [...category]
    └── work_history
The structure and its directory names map to frontend paths:
e.g. the src/resume/techstack directory generates namlit.dev/resume/techstack.
+page.svelte
Using src/resume/techstack will generate the frontend path correctly, however it won't display anything yet!
It requires at least a +page.svelte file to render content:
techstack
├── +page.svelte        # required to render content
└── [...category]
    └── +page.svelte    # required to render content
There are a couple more .svelte and .ts files available that work alongside the +page.svelte. They can be used for
loading data and additional rendering techniques like layouts:
techstack
├── +layout.svelte      # wraps around +page.svelte
├── +layout.ts          # loads data
├── +page.svelte        # required to render content
├── +page.ts            # loads data
└── [...category]
    ├── +page.svelte    # required to render content
    └── +page.ts        # loads data
This might look a bit overwhelming at first, but don't worry, it's actually quite simple :)
I'll go over everything in the upcoming sections!
+layout.svelte
Using a +layout.svelte can extract design & logic from pages, and help to streamline repeating patterns.
Layouts wrap around the +page.svelte in their own directory. It also wraps around all +page.svelte, and other
+layout.svelte in any of its child-directories.
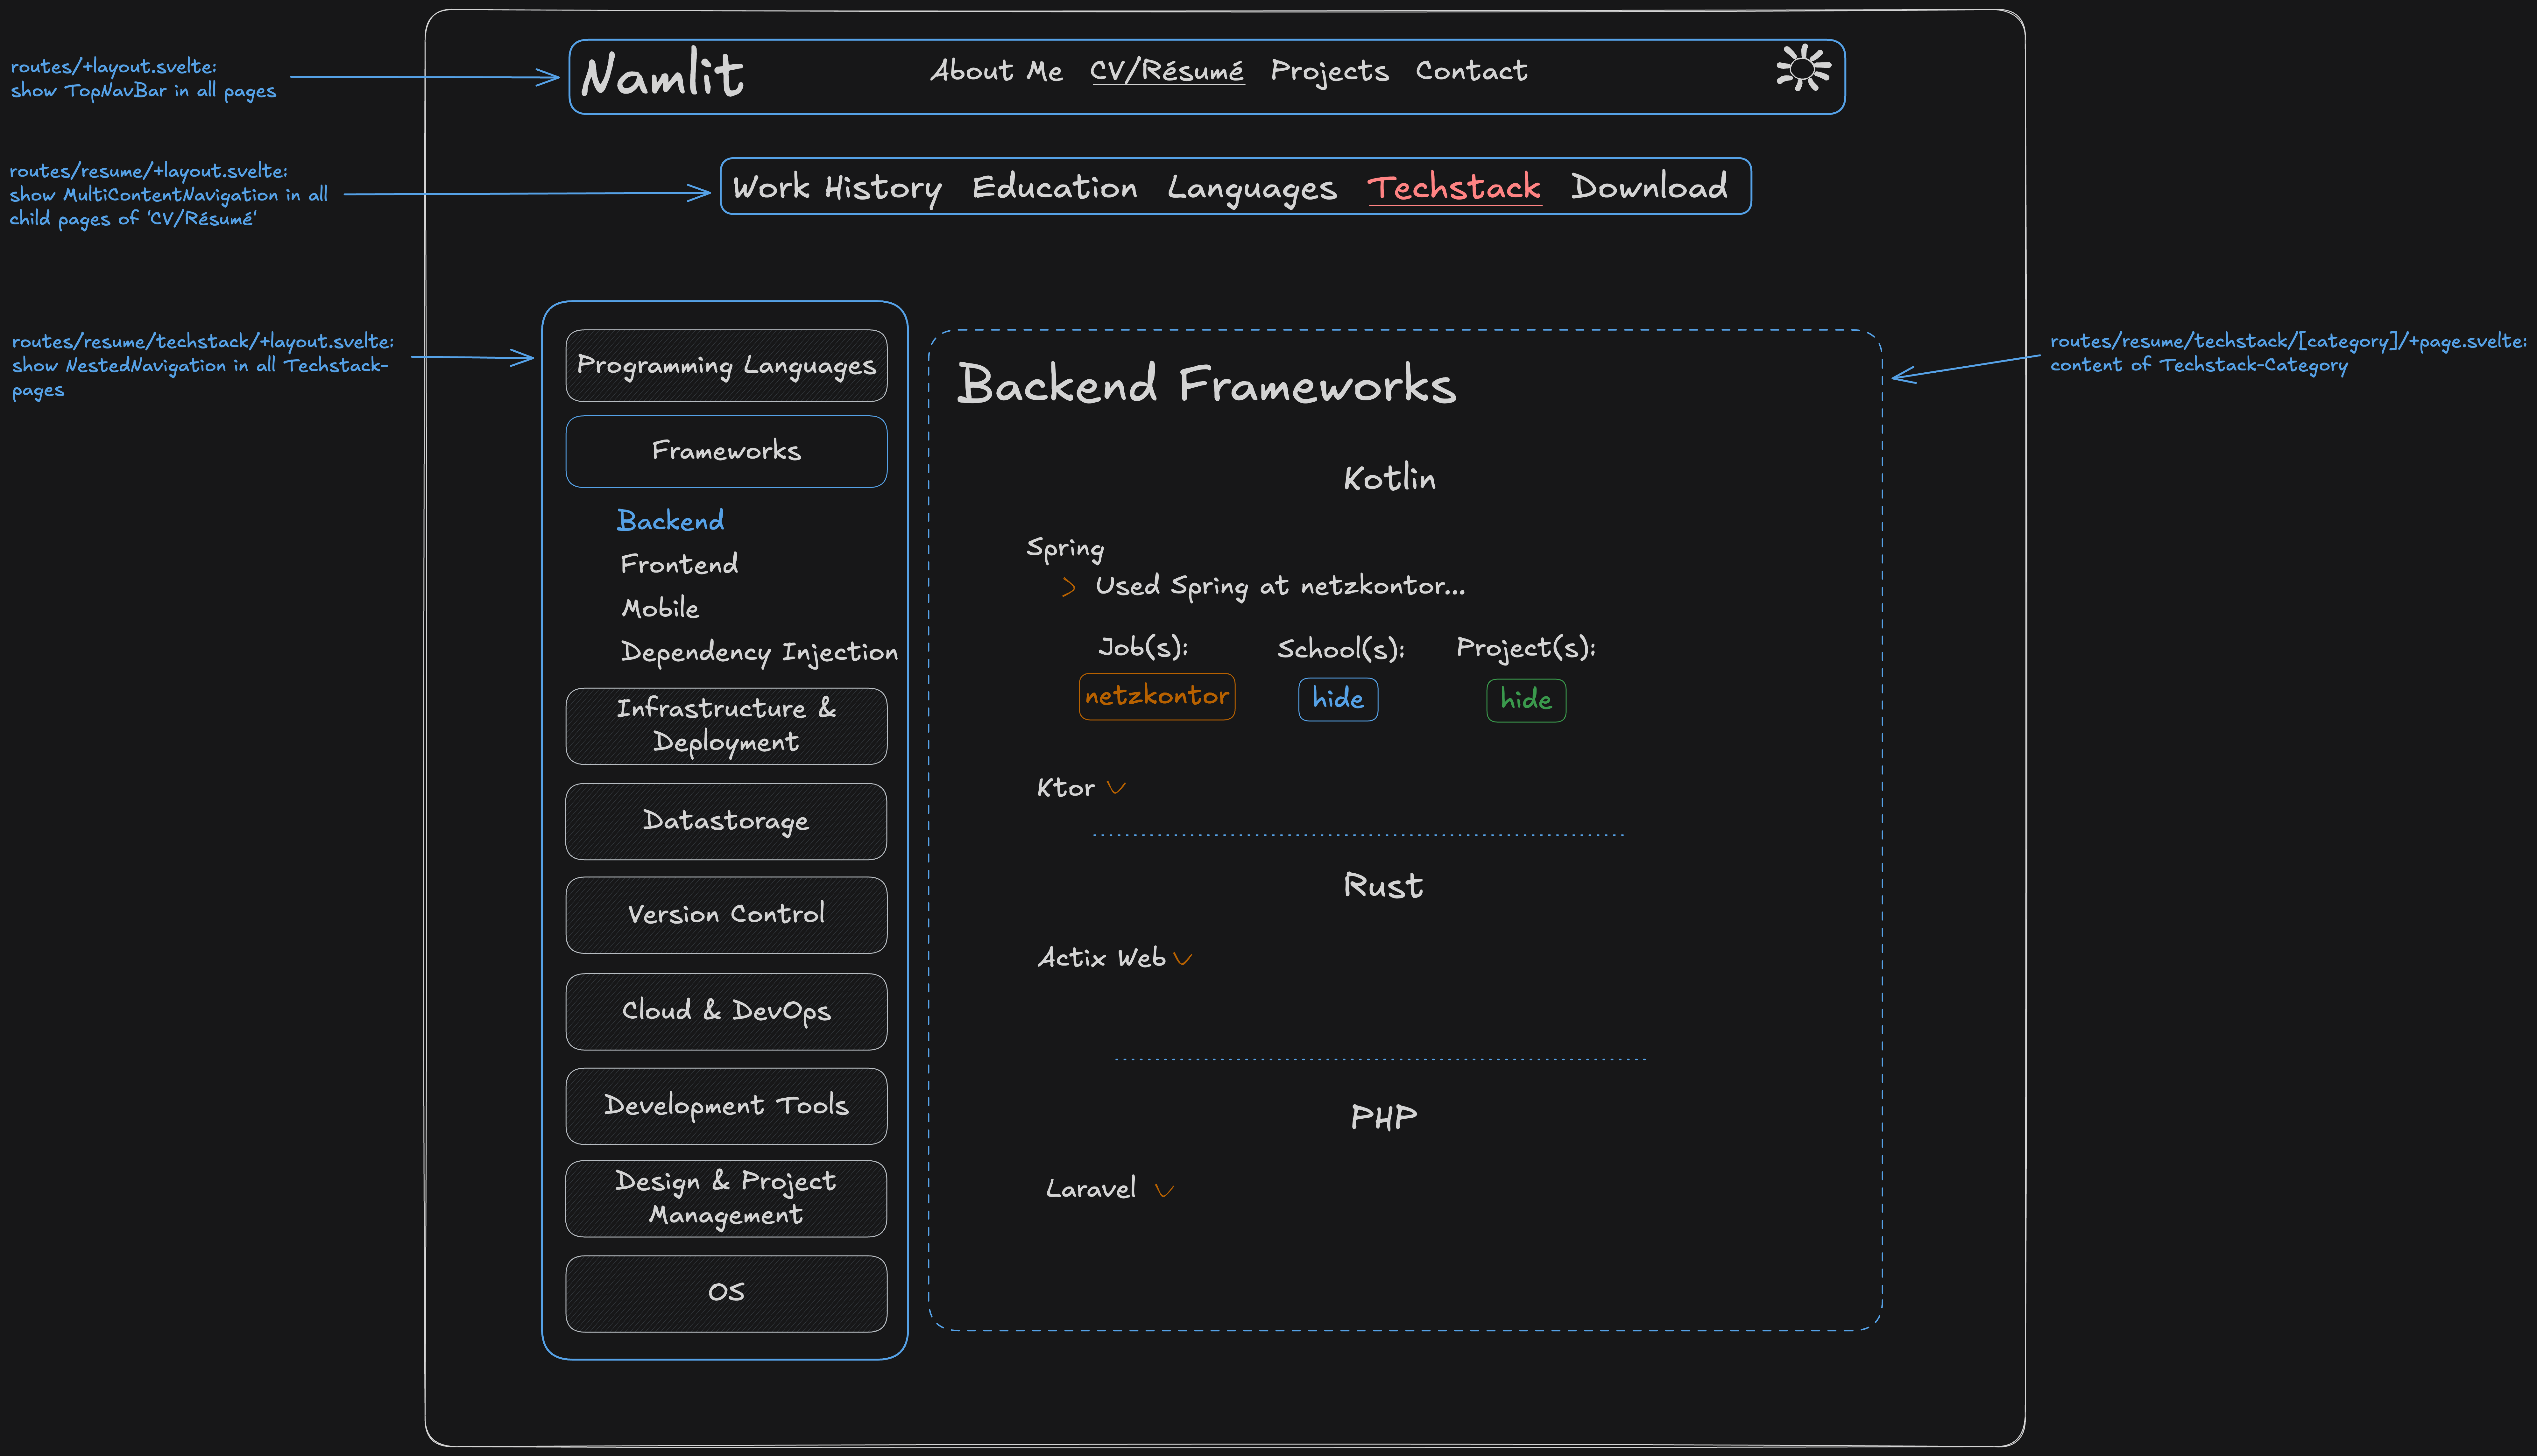
A common use-case for a layout would be something like
the Nested Navigation that you can find in
the Techstack's desktop view.
It wraps around every single Techstack page and renders the navigation on the left side:
As you can see, there are also parent-layouts above the techstack directory:
- routes/+layout.svelte
- routes/resume/+layout.svelte
These render a TopNavBar & MultiContentNavigation for their children.
Nested layouts help to separate concerns and unlock the true powers of Svelte components:
- Define a layout once.
- It applies to every child layout & page automatically.
- Focus on providing the main content.
- Modify independently.
Here is a simplified code snippet for the techstack/+layout.svelte (demonstration purpose only, actual
code varies):
<script lang="ts">
    import type { Snippet } from 'svelte';

    interface Props {
       data: {
          techstackNavigationItems: Array<TechstackNavigationItem>;
       };
       children: Snippet;
    }

    const { data, children }: Props = $props();

    const nestedNavigationItems: Array<NestedNavigationItem> = techstackNavigationItems.map(
        (item) => {
            return item.toNestedNavigationItem();
        }
    );
</script>

<div class="w-full mx-5 grid grid-cols-[1fr_auto_1fr] gap-x-5 items-center container">
    <aside class="self-start mx-auto max-w-xs">
       <NestedNavigation items={nestedNavigationItems} />
    </aside>

    <!-- key part -->
    <main class="w-[65ch] self-start">
       {@render children()}
    </main>

    <div class="w-0">
       <!-- Placeholder for grid -->
    </div>
</div>
It starts by loading the $props() with:
datawhich is passed down from the+layout.ts.childrenof type Snippet. It refers to all child layouts & pages relative to this+layout.svelteand is automatically inferred by Svelte Kit.
The HTML contains a grid with 3 columns:
- Left: NestedNavigation
- Center: rendered children
- Right: placeholder (to center content)
Main focus lies on {@render children()}, which uses Svelte's @render
template syntax! It renders all children in the center of the grid with
a Nested Navigation on the left.
techstack/+layout.svelte applies to the following child layouts & pages:
- techstack/+page.svelte
- techstack/[category]/+page.svelte
- (would apply to
techstack/[category]/+layout.sveltetoo, but that doesn't exist)
Important: layouts always load before pages. This applies to both .svelte and .ts files.
+layout.ts & +page.ts
The +layout.ts and +page.ts implement load-functions that always execute before the rendering of +layout.svelte
and +page.svelte!
techstack/+page.ts could look something like this:
import type {PageLoad} from './$types';


export const load: PageLoad = async () => {
    return {
        title: 'Techstack'
    };
};
Let's keep it simple and just return a title for now.
Svelte Kit then performs some magic in the background to make this data (our title) accessible inside the
+page.svelte:
<script lang="ts">
    interface Props {
       data: {
          title: string;
       };
    }

    const { data }: Props = $props();
</script>

<div>{data.title}</div>
It is now possible to access the title via Svelte's $props() rune!
A more common use-case would be fetching data from an external source like my Cache API. Once the data is fetched successfully, it gets returned just like the title.
On the first request to a page, the +layout.ts and +page.ts files execute both on client-, and server-side.
Every subsequent request executes only on the client's side unless specified otherwise. This improves performance and is
the preferred method in most cases.
Important: Because of the client-side execution, code in these load-functions is visible to anyone with access to
the website.
It is very important to be mindful of this to avoid accidental leaking of secrets!
The next section introduces server-load-functions to solve this issue.
+layout.server.ts & +page.server.ts
The +layout.server.ts and +page.server.ts implement server-load-functions.
They execute exclusively on the server to avoid accidental leaking of secrets. This makes them safer for working with a
direct connection to the database for example.
Server-load-functions have a very similar structure to regular load-functions. The key difference is that they use
PageServerLoad instead of PageLoad:
import type {PageServerLoad} from './$types';


export const load: PageServerLoad = async () => {
    return {
        title: 'Techstack'
    };
};
You will find very few .server.ts files in my project. I built my own API which doesn't require any secrets worth
hiding. Therefore, I don't have to worry about exposing anything in the frontend and can prioritise performance!
Note: The server-load-functions will always execute in order before regular load-functions if both co-exist in the
same directory.
They tend to be less performant tho.
Svelte Kit's order of operations
Just for completion, here is the order in which Svelte Kit loads/executes the files:
- +layout.server.ts
- +page.server.ts
- +layout.ts
- +page.ts
- +layout.svelte
- +page.svelte
Observation:
- Data loading always happens prior to rendering content.
- Data loading on the server always happens first.
- Layouts always load and render before pages.
src/lib
The content of lib varies based on architecture, team and project. Everyone builds their project a little different.
It's mostly components, business logic and models that are used frequently in more than one location. Any other module
inside the src directory can access this via the $lib alias.
Although I could give some examples here, I think it makes most sense to direct you to the Project Structure instead, where I will go into much more details!
I will go over some Svelte Kit fundamentals. It includes examples from my project for easier understanding and
visualization.
Feel free to jump ahead to my Project Structure if you
already know how Svelte & Svelte Kit work!
For an even more indepth guide on Svelte Kit, check out the official documentation.
root
Svelte Kit projects have a pretty simple structure:
frontend            # project name
├── node_modules    # auto-generated
├── src             # main working directory
│   ├── lib
│   └── routes
├── static          # holds static files
└── ...             # config-files
node_modules are auto-generated from the built dependencies.
static holds static files for the website.
I'm not really using this directory tho. The Static File Server
serves all images & documents to the frontend.
src is the main working directory with routes and libraries.
Other than that it's mostly config files for TypeScript, Vite, Dependencies, Docker and more.
src/routes
The routes inside the src directory are key to the frontend routing:
routes
├── about_me
│   ├── bio
│   └── interests
├── contact
├── projects
│   └── [project_slug]
│       └── [...post_slug]
└── resume
    ├── download
    ├── education
    ├── languages
    ├── techstack
    │   └── [...category]
    └── work_history
The structure and its directory names map to frontend paths:
e.g. the src/resume/techstack directory generates namlit.dev/resume/techstack.
+page.svelte
Using src/resume/techstack will generate the frontend path correctly, however it won't display anything yet!
It requires at least a +page.svelte file to render content:
techstack
├── +page.svelte        # required to render content
└── [...category]
    └── +page.svelte    # required to render content
There are a couple more .svelte and .ts files available that work alongside the +page.svelte. They can be used for
loading data and additional rendering techniques like layouts:
techstack
├── +layout.svelte      # wraps around +page.svelte
├── +layout.ts          # loads data
├── +page.svelte        # required to render content
├── +page.ts            # loads data
└── [...category]
    ├── +page.svelte    # required to render content
    └── +page.ts        # loads data
This might look a bit overwhelming at first, but don't worry, it's actually quite simple :)
I'll go over everything in the upcoming sections!
+layout.svelte
Using a +layout.svelte can extract design & logic from pages, and help to streamline repeating patterns.
Layouts wrap around the +page.svelte in their own directory. It also wraps around all +page.svelte, and other
+layout.svelte in any of its child-directories.
A common use-case for a layout would be something like
the Nested Navigation that you can find in
the Techstack's desktop view.
It wraps around every single Techstack page and renders the navigation on the left side:
 As you can see, there are also parent-layouts above the techstack directory:
- routes/+layout.svelte
- routes/resume/+layout.svelte
These render a TopNavBar & MultiContentNavigation for their children.
Nested layouts help to separate concerns and unlock the true powers of Svelte components:
- Define a layout once.
- It applies to every child layout & page automatically.
- Focus on providing the main content.
- Modify independently.
Here is a simplified code snippet for the techstack/+layout.svelte (demonstration purpose only, actual
code varies):
<script lang="ts">
    import type { Snippet } from 'svelte';

    interface Props {
       data: {
          techstackNavigationItems: Array<TechstackNavigationItem>;
       };
       children: Snippet;
    }

    const { data, children }: Props = $props();

    const nestedNavigationItems: Array<NestedNavigationItem> = techstackNavigationItems.map(
        (item) => {
            return item.toNestedNavigationItem();
        }
    );
</script>

<div class="w-full mx-5 grid grid-cols-[1fr_auto_1fr] gap-x-5 items-center container">
    <aside class="self-start mx-auto max-w-xs">
       <NestedNavigation items={nestedNavigationItems} />
    </aside>

    <!-- key part -->
    <main class="w-[65ch] self-start">
       {@render children()}
    </main>

    <div class="w-0">
       <!-- Placeholder for grid -->
    </div>
</div>
It starts by loading the $props() with:
datawhich is passed down from the+layout.ts.childrenof type Snippet. It refers to all child layouts & pages relative to this+layout.svelteand is automatically inferred by Svelte Kit.
The HTML contains a grid with 3 columns:
- Left: NestedNavigation
- Center: rendered children
- Right: placeholder (to center content)
Main focus lies on {@render children()}, which uses Svelte's @render
template syntax! It renders all children in the center of the grid with
a Nested Navigation on the left.
techstack/+layout.svelte applies to the following child layouts & pages:
- techstack/+page.svelte
- techstack/[category]/+page.svelte
- (would apply to
techstack/[category]/+layout.sveltetoo, but that doesn't exist)
Important: layouts always load before pages. This applies to both .svelte and .ts files.
+layout.ts & +page.ts
The +layout.ts and +page.ts implement load-functions that always execute before the rendering of +layout.svelte
and +page.svelte!
techstack/+page.ts could look something like this:
import type {PageLoad} from './$types';


export const load: PageLoad = async () => {
    return {
        title: 'Techstack'
    };
};
Let's keep it simple and just return a title for now.
Svelte Kit then performs some magic in the background to make this data (our title) accessible inside the
+page.svelte:
<script lang="ts">
    interface Props {
       data: {
          title: string;
       };
    }

    const { data }: Props = $props();
</script>

<div>{data.title}</div>
It is now possible to access the title via Svelte's $props() rune!
A more common use-case would be fetching data from an external source like my Cache API. Once the data is fetched successfully, it gets returned just like the title.
On the first request to a page, the +layout.ts and +page.ts files execute both on client-, and server-side.
Every subsequent request executes only on the client's side unless specified otherwise. This improves performance and is
the preferred method in most cases.
Important: Because of the client-side execution, code in these load-functions is visible to anyone with access to
the website.
It is very important to be mindful of this to avoid accidental leaking of secrets!
The next section introduces server-load-functions to solve this issue.
+layout.server.ts & +page.server.ts
The +layout.server.ts and +page.server.ts implement server-load-functions.
They execute exclusively on the server to avoid accidental leaking of secrets. This makes them safer for working with a
direct connection to the database for example.
Server-load-functions have a very similar structure to regular load-functions. The key difference is that they use
PageServerLoad instead of PageLoad:
import type {PageServerLoad} from './$types';


export const load: PageServerLoad = async () => {
    return {
        title: 'Techstack'
    };
};
You will find very few .server.ts files in my project. I built my own API which doesn't require any secrets worth
hiding. Therefore, I don't have to worry about exposing anything in the frontend and can prioritise performance!
Note: The server-load-functions will always execute in order before regular load-functions if both co-exist in the
same directory.
They tend to be less performant tho.
Svelte Kit's order of operations
Just for completion, here is the order in which Svelte Kit loads/executes the files:
- +layout.server.ts
- +page.server.ts
- +layout.ts
- +page.ts
- +layout.svelte
- +page.svelte
Observation:
- Data loading always happens prior to rendering content.
- Data loading on the server always happens first.
- Layouts always load and render before pages.
src/lib
The content of lib varies based on architecture, team and project. Everyone builds their project a little different.
It's mostly components, business logic and models that are used frequently in more than one location. Any other module
inside the src directory can access this via the $lib alias.
Although I could give some examples here, I think it makes most sense to direct you to the Project Structure instead, where I will go into much more details!
Svelte Kit Basics
I will go over some Svelte Kit fundamentals. It includes examples from my project for easier understanding and
visualization.
Feel free to jump ahead to my Project Structure if you
already know how Svelte & Svelte Kit work!
For an even more indepth guide on Svelte Kit, check out the official documentation.
root
Svelte Kit projects have a pretty simple structure:
frontend            # project name
├── node_modules    # auto-generated
├── src             # main working directory
│   ├── lib
│   └── routes
├── static          # holds static files
└── ...             # config-files
node_modules are auto-generated from the built dependencies.
static holds static files for the website.
I'm not really using this directory tho. The Static File Server
serves all images & documents to the frontend.
src is the main working directory with routes and libraries.
Other than that it's mostly config files for TypeScript, Vite, Dependencies, Docker and more.
src/routes
The routes inside the src directory are key to the frontend routing:
routes
├── about_me
│   ├── bio
│   └── interests
├── contact
├── projects
│   └── [project_slug]
│       └── [...post_slug]
└── resume
    ├── download
    ├── education
    ├── languages
    ├── techstack
    │   └── [...category]
    └── work_history
The structure and its directory names map to frontend paths:
e.g. the src/resume/techstack directory generates namlit.dev/resume/techstack.
+page.svelte
Using src/resume/techstack will generate the frontend path correctly, however it won't display anything yet!
It requires at least a +page.svelte file to render content:
techstack
├── +page.svelte        # required to render content
└── [...category]
    └── +page.svelte    # required to render content
There are a couple more .svelte and .ts files available that work alongside the +page.svelte. They can be used for
loading data and additional rendering techniques like layouts:
techstack
├── +layout.svelte      # wraps around +page.svelte
├── +layout.ts          # loads data
├── +page.svelte        # required to render content
├── +page.ts            # loads data
└── [...category]
    ├── +page.svelte    # required to render content
    └── +page.ts        # loads data
This might look a bit overwhelming at first, but don't worry, it's actually quite simple :)
I'll go over everything in the upcoming sections!
+layout.svelte
Using a +layout.svelte can extract design & logic from pages, and help to streamline repeating patterns.
Layouts wrap around the +page.svelte in their own directory. It also wraps around all +page.svelte, and other
+layout.svelte in any of its child-directories.
A common use-case for a layout would be something like
the Nested Navigation that you can find in
the Techstack's desktop view.
It wraps around every single Techstack page and renders the navigation on the left side:
As you can see, there are also parent-layouts above the techstack directory:
- routes/+layout.svelte
- routes/resume/+layout.svelte
These render a TopNavBar & MultiContentNavigation for their children.
Nested layouts help to separate concerns and unlock the true powers of Svelte components:
- Define a layout once.
- It applies to every child layout & page automatically.
- Focus on providing the main content.
- Modify independently.
Here is a simplified code snippet for the techstack/+layout.svelte (demonstration purpose only, actual
code varies):
<script lang="ts">
    import type { Snippet } from 'svelte';

    interface Props {
       data: {
          techstackNavigationItems: Array<TechstackNavigationItem>;
       };
       children: Snippet;
    }

    const { data, children }: Props = $props();

    const nestedNavigationItems: Array<NestedNavigationItem> = techstackNavigationItems.map(
        (item) => {
            return item.toNestedNavigationItem();
        }
    );
</script>

<div class="w-full mx-5 grid grid-cols-[1fr_auto_1fr] gap-x-5 items-center container">
    <aside class="self-start mx-auto max-w-xs">
       <NestedNavigation items={nestedNavigationItems} />
    </aside>

    <!-- key part -->
    <main class="w-[65ch] self-start">
       {@render children()}
    </main>

    <div class="w-0">
       <!-- Placeholder for grid -->
    </div>
</div>
It starts by loading the $props() with:
datawhich is passed down from the+layout.ts.childrenof type Snippet. It refers to all child layouts & pages relative to this+layout.svelteand is automatically inferred by Svelte Kit.
The HTML contains a grid with 3 columns:
- Left: NestedNavigation
- Center: rendered children
- Right: placeholder (to center content)
Main focus lies on {@render children()}, which uses Svelte's @render
template syntax! It renders all children in the center of the grid with
a Nested Navigation on the left.
techstack/+layout.svelte applies to the following child layouts & pages:
- techstack/+page.svelte
- techstack/[category]/+page.svelte
- (would apply to
techstack/[category]/+layout.sveltetoo, but that doesn't exist)
Important: layouts always load before pages. This applies to both .svelte and .ts files.
+layout.ts & +page.ts
The +layout.ts and +page.ts implement load-functions that always execute before the rendering of +layout.svelte
and +page.svelte!
techstack/+page.ts could look something like this:
import type {PageLoad} from './$types';


export const load: PageLoad = async () => {
    return {
        title: 'Techstack'
    };
};
Let's keep it simple and just return a title for now.
Svelte Kit then performs some magic in the background to make this data (our title) accessible inside the
+page.svelte:
<script lang="ts">
    interface Props {
       data: {
          title: string;
       };
    }

    const { data }: Props = $props();
</script>

<div>{data.title}</div>
It is now possible to access the title via Svelte's $props() rune!
A more common use-case would be fetching data from an external source like my Cache API. Once the data is fetched successfully, it gets returned just like the title.
On the first request to a page, the +layout.ts and +page.ts files execute both on client-, and server-side.
Every subsequent request executes only on the client's side unless specified otherwise. This improves performance and is
the preferred method in most cases.
Important: Because of the client-side execution, code in these load-functions is visible to anyone with access to
the website.
It is very important to be mindful of this to avoid accidental leaking of secrets!
The next section introduces server-load-functions to solve this issue.
+layout.server.ts & +page.server.ts
The +layout.server.ts and +page.server.ts implement server-load-functions.
They execute exclusively on the server to avoid accidental leaking of secrets. This makes them safer for working with a
direct connection to the database for example.
Server-load-functions have a very similar structure to regular load-functions. The key difference is that they use
PageServerLoad instead of PageLoad:
import type {PageServerLoad} from './$types';


export const load: PageServerLoad = async () => {
    return {
        title: 'Techstack'
    };
};
You will find very few .server.ts files in my project. I built my own API which doesn't require any secrets worth
hiding. Therefore, I don't have to worry about exposing anything in the frontend and can prioritise performance!
Note: The server-load-functions will always execute in order before regular load-functions if both co-exist in the
same directory.
They tend to be less performant tho.
Svelte Kit's order of operations
Just for completion, here is the order in which Svelte Kit loads/executes the files:
- +layout.server.ts
- +page.server.ts
- +layout.ts
- +page.ts
- +layout.svelte
- +page.svelte
Observation:
- Data loading always happens prior to rendering content.
- Data loading on the server always happens first.
- Layouts always load and render before pages.
src/lib
The content of lib varies based on architecture, team and project. Everyone builds their project a little different.
It's mostly components, business logic and models that are used frequently in more than one location. Any other module
inside the src directory can access this via the $lib alias.
Although I could give some examples here, I think it makes most sense to direct you to the Project Structure instead, where I will go into much more details!
I will go over some Svelte Kit fundamentals. It includes examples from my project for easier understanding and
visualization.
Feel free to jump ahead to my Project Structure if you
already know how Svelte & Svelte Kit work!
For an even more indepth guide on Svelte Kit, check out the official documentation.
root
Svelte Kit projects have a pretty simple structure:
frontend            # project name
├── node_modules    # auto-generated
├── src             # main working directory
│   ├── lib
│   └── routes
├── static          # holds static files
└── ...             # config-files
node_modules are auto-generated from the built dependencies.
static holds static files for the website.
I'm not really using this directory tho. The Static File Server
serves all images & documents to the frontend.
src is the main working directory with routes and libraries.
Other than that it's mostly config files for TypeScript, Vite, Dependencies, Docker and more.
src/routes
The routes inside the src directory are key to the frontend routing:
routes
├── about_me
│   ├── bio
│   └── interests
├── contact
├── projects
│   └── [project_slug]
│       └── [...post_slug]
└── resume
    ├── download
    ├── education
    ├── languages
    ├── techstack
    │   └── [...category]
    └── work_history
The structure and its directory names map to frontend paths:
e.g. the src/resume/techstack directory generates namlit.dev/resume/techstack.
+page.svelte
Using src/resume/techstack will generate the frontend path correctly, however it won't display anything yet!
It requires at least a +page.svelte file to render content:
techstack
├── +page.svelte        # required to render content
└── [...category]
    └── +page.svelte    # required to render content
There are a couple more .svelte and .ts files available that work alongside the +page.svelte. They can be used for
loading data and additional rendering techniques like layouts:
techstack
├── +layout.svelte      # wraps around +page.svelte
├── +layout.ts          # loads data
├── +page.svelte        # required to render content
├── +page.ts            # loads data
└── [...category]
    ├── +page.svelte    # required to render content
    └── +page.ts        # loads data
This might look a bit overwhelming at first, but don't worry, it's actually quite simple :)
I'll go over everything in the upcoming sections!
+layout.svelte
Using a +layout.svelte can extract design & logic from pages, and help to streamline repeating patterns.
Layouts wrap around the +page.svelte in their own directory. It also wraps around all +page.svelte, and other
+layout.svelte in any of its child-directories.
A common use-case for a layout would be something like
the Nested Navigation that you can find in
the Techstack's desktop view.
It wraps around every single Techstack page and renders the navigation on the left side:
As you can see, there are also parent-layouts above the techstack directory:
- routes/+layout.svelte
- routes/resume/+layout.svelte
These render a TopNavBar & MultiContentNavigation for their children.
Nested layouts help to separate concerns and unlock the true powers of Svelte components:
- Define a layout once.
- It applies to every child layout & page automatically.
- Focus on providing the main content.
- Modify independently.
Here is a simplified code snippet for the techstack/+layout.svelte (demonstration purpose only, actual
code varies):
<script lang="ts">
    import type { Snippet } from 'svelte';

    interface Props {
       data: {
          techstackNavigationItems: Array<TechstackNavigationItem>;
       };
       children: Snippet;
    }

    const { data, children }: Props = $props();

    const nestedNavigationItems: Array<NestedNavigationItem> = techstackNavigationItems.map(
        (item) => {
            return item.toNestedNavigationItem();
        }
    );
</script>

<div class="w-full mx-5 grid grid-cols-[1fr_auto_1fr] gap-x-5 items-center container">
    <aside class="self-start mx-auto max-w-xs">
       <NestedNavigation items={nestedNavigationItems} />
    </aside>

    <!-- key part -->
    <main class="w-[65ch] self-start">
       {@render children()}
    </main>

    <div class="w-0">
       <!-- Placeholder for grid -->
    </div>
</div>
It starts by loading the $props() with:
datawhich is passed down from the+layout.ts.childrenof type Snippet. It refers to all child layouts & pages relative to this+layout.svelteand is automatically inferred by Svelte Kit.
The HTML contains a grid with 3 columns:
- Left: NestedNavigation
- Center: rendered children
- Right: placeholder (to center content)
Main focus lies on {@render children()}, which uses Svelte's @render
template syntax! It renders all children in the center of the grid with
a Nested Navigation on the left.
techstack/+layout.svelte applies to the following child layouts & pages:
- techstack/+page.svelte
- techstack/[category]/+page.svelte
- (would apply to
techstack/[category]/+layout.sveltetoo, but that doesn't exist)
Important: layouts always load before pages. This applies to both .svelte and .ts files.
+layout.ts & +page.ts
The +layout.ts and +page.ts implement load-functions that always execute before the rendering of +layout.svelte
and +page.svelte!
techstack/+page.ts could look something like this:
import type {PageLoad} from './$types';


export const load: PageLoad = async () => {
    return {
        title: 'Techstack'
    };
};
Let's keep it simple and just return a title for now.
Svelte Kit then performs some magic in the background to make this data (our title) accessible inside the
+page.svelte:
<script lang="ts">
    interface Props {
       data: {
          title: string;
       };
    }

    const { data }: Props = $props();
</script>

<div>{data.title}</div>
It is now possible to access the title via Svelte's $props() rune!
A more common use-case would be fetching data from an external source like my Cache API. Once the data is fetched successfully, it gets returned just like the title.
On the first request to a page, the +layout.ts and +page.ts files execute both on client-, and server-side.
Every subsequent request executes only on the client's side unless specified otherwise. This improves performance and is
the preferred method in most cases.
Important: Because of the client-side execution, code in these load-functions is visible to anyone with access to
the website.
It is very important to be mindful of this to avoid accidental leaking of secrets!
The next section introduces server-load-functions to solve this issue.
+layout.server.ts & +page.server.ts
The +layout.server.ts and +page.server.ts implement server-load-functions.
They execute exclusively on the server to avoid accidental leaking of secrets. This makes them safer for working with a
direct connection to the database for example.
Server-load-functions have a very similar structure to regular load-functions. The key difference is that they use
PageServerLoad instead of PageLoad:
import type {PageServerLoad} from './$types';


export const load: PageServerLoad = async () => {
    return {
        title: 'Techstack'
    };
};
You will find very few .server.ts files in my project. I built my own API which doesn't require any secrets worth
hiding. Therefore, I don't have to worry about exposing anything in the frontend and can prioritise performance!
Note: The server-load-functions will always execute in order before regular load-functions if both co-exist in the
same directory.
They tend to be less performant tho.
Svelte Kit's order of operations
Just for completion, here is the order in which Svelte Kit loads/executes the files:
- +layout.server.ts
- +page.server.ts
- +layout.ts
- +page.ts
- +layout.svelte
- +page.svelte
Observation:
- Data loading always happens prior to rendering content.
- Data loading on the server always happens first.
- Layouts always load and render before pages.
src/lib
The content of lib varies based on architecture, team and project. Everyone builds their project a little different.
It's mostly components, business logic and models that are used frequently in more than one location. Any other module
inside the src directory can access this via the $lib alias.
Although I could give some examples here, I think it makes most sense to direct you to the Project Structure instead, where I will go into much more details!